Tuesday, October 27, 2009

Snow Leopard Digital Classroom

Hello there!

Wow! It's been a while since my last post and I'm not going to bore you with my excuses or my promises to be better about posting to my blog more regularly, but… I do plan on posting to my blog more regularly! This post is to announce the release of my first official book. The Mac OS X Snow Leopard Digital Classroom. It's been a lot of work and has taken longer than I thought it would but it's finally available at all of the major booksellers.


About the book
I wrote this book as a companion for people who've recently purchased a mac whether they be a new Mac user (switcher) or simply are upgrading to a new computer. I often hear from people who are frustrated because they don't feel comfortable using a their computer or want to know more about their computer and what they can do with it.

The book covers new features of Snow Leopard (Mac OS X 10.6) as well as features that have been available in the Mac OS for several versions. It's a nuts-to-bolts how to book that walks you through lessons step-by-step as if I were sitting there next to you. If you want to know how to back up your computer or how the new Quicktime player can help you edit your video or how to set up your e-mail account or how to take advantage of the new version of the Safari web browser, this book is for you!

I hope you enjoy it and please recommend it to your friends. I encourage everyone to go to Amazon.com and post a review of the book. I also encourage your comments here on the blog, I'm anxious to hear what you think.

Until next time!

Sunday, April 19, 2009

Cre8 2009 - A great time!

Well, I'm sitting here at the Orlando International Airport and thinking back to the past week and about the events that took place. It was great to see familiar faces from Cre8 (and PDF Conferences) of past years and it was also great to meet new people who were attending for the first time.

I presented five sessions this year, all on different aspects of Adobe InDesign CS4.

  • Master All that InDesign has to offer

  • Repurposing Content in InDesign using XML

  • Improving Editorial Workflows with InDesign and InCopy

  • Taking Advantage of Styles in InDesign

  • InDeisgn Take it to the Max!


I think the sessions went really well and there were a ton of great questions from enthusiastic attendees looking for answers to existing problems and looking for newer, more efficient ways of getting things done in InDesign.

The conference wasn't all work and no play mind you. There were several meet and greets at the end of each day and there was an abundance of meeting and greeting going on!

I'm once again hoping to improve the frequency with which I post to this blog in hopes of answering questions both basic and advanced that can help people work better and smarter in InDesign and other Creative Suite applications. I'm going to push Rob to do the same as well. I think in the past I wanted every post to be a complex, problem-solving, and in-depth post but have realized that small tips and tricks could be just as valuable. That's not to say that I'm forgoing any detailed posts… I've just decided to mix it up a bit.

I encourage your comments! As a matter of fact I depend on them. Your questions and comments will help me to create interesting and valuable posts that will appear on this blog. Send your ideas! Tell us what you think! We look forward to hearing from and seeing you all in the future. Thanks again for a great conference!

chad

Friday, November 7, 2008

Digital Classroom Series


Hello All!
Adobe's recent announcement and current shipment of CS4 is exciting news! My previous post included my favorite features of InDesign CS4 and I'm sure everyone has heard news and maybe have even seen some of the new features of CS4.

I'm happy to announce that there is a new series of books that have been co-written by Chad and Rob that can help you get up to speed with CS4 fast. The Digital Classroom Series of books includes titles for many Adobe applications including InDesign, Photoshop, Illustrator, Dreamweaver, and Flash. The books are written as if you were sitting in the room with one of us instructing you! The books include a DVD with lesson files that are used as you are guided step-by-step through the new features of CS4. Below are links to the Digital Classroom titles and we encourage you to give them a try. I think you'll find them extremely helpful and encourage your feedback here at our blog and on Amazon.com. Until next time!


InDesign CS4 Digital Classroom
Illustrator CS4 Digital Classroom
Photoshop CS4 Digital Classroom
Dreamweaver CS4 Digital Classroom
Flash CS4 Professional Digital Classroom


Friday, September 26, 2008

My Top Righteous CS4 Features!

I'm sure this isn't the first post of it's nature and it certainly wont be the last. But my good friend Brenda over at ineedchocolate.com asked me if I would compile my top ten new features of  CS4. I've also received several requests from clients to do the same. I'll start with InDesign and follow up with posts on the other applications. This is by no means a comprehensive list, it's just some of my favorite features at a glance so here goes.

InDesign
GREP styles - Everyone knows by this point how much of a GREP freak I am and now in CS4 you can actually apply GREP commands within a style. For instance I can tell every instance of a word or words that appear within parentheses to format as italic automatically! This is beyond nested styes, this is something that people have been asking about for several versions now. A huge benefit to anyone working with longer documents.

New Zoom Feature - I've always kind of liked the Navigator panel in previous versions of InDesign, but I have to admit, I rarely used it. InDesign CS4 in some ways integrates the navigator into the InDesign interface. If you have the hand tool selected, you can click-and-hold for a second and it zooms out so you can see your entire document and you get a red rectangle like in the old Navigator panel that allows you to move to a different part of your document and then when you release the mouse button, it zooms back in on that area. I like this implementation and think I'll be using it a lot!


Smart Guides - This features applies to both InDesign and Illustrator actually, but the new smart guides feature in both programs has been significantly improved. Their actually smart now! They aren't as obtrusive as smart guides in previous versions of illustrator and they actually work very well. You can position items on your page and it shows you spacing details, sizing details (if you're scaling), and of course positioning details relative to other objects on your page. This will eliminate several trips to the Align panel in both programs.

Application Frame - This applies to all CS4 programs and only really affects Mac users. They've added the application frame that puts a solid gray background behind your documents so you don't see your desktop while you are working. It's completely optional so don't worry! I rarely like features that mimic the Windows version of anything however it always annoyed me that my cluttered desktop was always looming in the background of documents that I was working on. I find this a welcome addition.

Dynamic Preflighting - While working on an InDesign document you now get an active preflight status in the lower-left corner of the screen, making you aware of any potential issues that appear within your document. In addition, you can now create preflight profiles that control what InDesign looks for and considers a problem. The preflighting is much more robust than it was in previous versions. Still not a full-featured preflight program, but significantly improved!

Rotate Spread View - You can now rotate the view of individual spreads in a document to make it easier to work on. For instance, when you have that brochure that has a tear-off panel and the content is rotated. You can simply rotate that page to make it easier to work on!

Nested Line Styles - This one is really cool! You can now apply formatting to text in the nested styles section to lines of text within a paragraph. For instance, maybe you wanted the first two lines of a paragraph to appear in small caps. You can now do that in CS4!

Flash Export - Adobe continued it's push to integrate all of the applications in CS4. You can now export your documents to a flash .swf file that includes page transitions. This is a great way to get your feet wet with flash!

Friday, August 22, 2008

A Better Package

Recently I was doing InDesign training for a client and after showing them the package feature, one of the students asked if there was an easy way to package multiple InDesign files so that the resulting package folder contained one each of the links and fonts folder so that you don't have one each of these folders for every InDesign file.

I had to think about this for a second and initially started thinking about potential third-party applications that may fit the bill. After a few minutes, I realized that InDesign has this feature built right in although it exists in an obscure panel that few people ever use.

The Book panel in InDesign is used to assemble multiple individual InDesign files into one cohesive book or magazine although we are going to use a very minute component of the book panel for our specific need.

The first step will be to create a new book by going to the File menu and choosing New > Book.

Next, click the + (plus) button at the bottom of the Book panel and select all of the InDesign documents that you'd like to package. If all of the documents reside in the same folder you can select multiple files by holding down the shift key to select contiguous files or the Command (Mac) or Control (Windows) key to select non-contiguous files. Otherwise, you may have to perform this step a few times to select all of your files.

Once all of your files have been added to the Book panel, you can click on the panel menu of the Book panel and choose "Package Book for Print." This will take you to the normal window that you see when you package files normally. Simply choose your options and InDesign will package all of them into the same folder with one tidy Fonts folder and one Links folder.


Now, any workaround always comes with a gotcha or two. In this case you probably noticed that when you add documents to the Book panel, InDesign wants to consecutively number the pages for you as in a typical book. If your InDesign documents do not contain automatic page numbering on the master pages, it won't affect much in your document at all except that the page numbers in the Pages panel will have changed. If your documents do contain automatic page numbering on the master pages, then the Book panel will have changed those numbers. Fortunately the fix is pretty easy. Simply open up each packaged InDesign file, select the first page of each document and reset the page numbers by going to the panel menu of the Pages panel and choosing Numbering and Section options and setting each document to start page numbering at 1. A bit of added work however it sure beats manually organizing several packaged InDesign files and merging the fonts and links folder in each one.

I'd love to hear everyone's comments on this post. Take care and I look forward to hearing from you!

Monday, March 17, 2008

Get a GREP! Part 3

Alright! Time for the final post in this series of GREP techniques! What I've done is created a graphic inside of InDesign using various tools. The end result is a vector-based element and I've highlighted it using the Direct Selection tool so you can see the points on the path that make up the shape.


Although I created this within InDesign, it could just as easily be a placed vector graphic from Illustrator or even an image from Photoshop. This method will work regardless of what type of graphic you are using.

Next you'll need to click on the graphic with your Selection Tool (black arrow) and choose Edit>Copy. Now switch to your Type Tool and click in an area of text where you'd like the graphic to appear and choose Edit>Paste. You've just created an in-line graphic which is a graphic that acts like a piece of text within InDesign. What we're doing here is setting up one instance of the graphic the way we'd like it to appear in all of our frames and then we'll automate it using GREP.


The main advantage of an in-line graphic is that it will behave like a character of text and therefore will flow with the text whenever an edit is made anywhere within the text that could affect the in-line graphic. (whew!).

At this point you could simply run the GREP search as you did in the previous post because it is actually pasting the contents of the clipboard in the change to: field. That being said, I can never leave well enough alone so I'm going to take it one step further. I'm going to precisely adjust the position of that graphic by making it an anchored object.

Click on the in-line graphic with the Selection tool and choose Object>Anchored Object>Options from the menu at the top of your screen. In the Anchored Object Options dialog box, set the Position to Custom, set the X relative to anchor marker and the Y relative to baseline, and turn the Preview checkbox on and click OK.


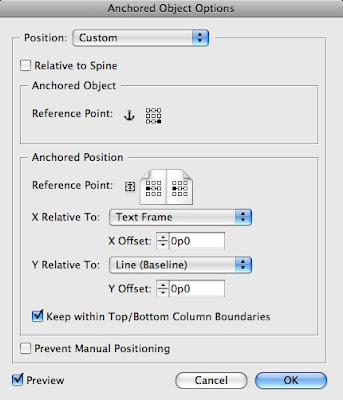
Now, if you haven't worked with Anchored Objects before, this dialog box can seem a bit daunting (leave comments if you'd like this to be a future blog topic) but we're going to simplify it. After you clicked OK, your graphic probably jumped away from where you originally pasted it which is fine. Using your Selection tool simply drag the graphic back to where it was and position it the way you would like it to appear with your text. Now go back to Object>Anchored Object>Options and check the "Prevent Manual Positioning" checkbox and click OK. This prevents anyone from being able to drag the graphic manually once you've positioned it.

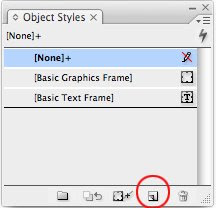
We're almost done here so stay with me! We want all of the end-it graphics to appear in the same position relative to the end of the text so with that graphic still selected with your Selection tool, go to your Object Styles panel and Alt/Option+click on the Create new style button at the bottom of the Object Styles panel. Call the style end-it, Click the "Apply Style to selection" checkbox and click OK. An object style will apply the positioning that was applied to the end-it graphic to any other graphic that you apply it to. VERY IMPORTANT! Click on the end-it graphic and you're end-it Object Style should be highlighted in the Object Styles panel. CHOOSE EDIT>COPY. This will copy the graphic with the Object style applied to the clipboard.


Now, let's jump back into the Find/Change dialog box and click on the GREP tab. We're literally going to run the exact same GREP search that we did in part 2! Because the graphic with the Object Style has been copied to the clipboard, the Change to: portion of the GREP search should also apply the formatting to the replaced character. Run the GREP search on the Document (not just the story) and your end-it character should appear at the end of every story! Now, if you don't want the end-it character to appear after every single story in your document, the trick is to apply Paragraph styles to your text. In the example document that I've been using, I created several Paragraph Styles for the captions, body, and headings. What this allows me to do is indicate which stories of text to apply the end-it character to. Click on the More Options button within the Find/Change dialog box and in the Find Format: Section, click on the "Specify Attributes to Find" button and then choose the Paragraph style that you want to restrict your search to. Click OK. Then click change all. You should now have an end-it character at the end of only the stories for which the appropriate Paragraph Style is applied!


Thursday, March 13, 2008

Get a GREP! Part 2

In my previous post you saw how easy it is to use GREP to put a character at the end of a story. Something like this would require a significant amount of time in the past and would also open up the potential for human error.

One problem with the method used in part one was the fact that the end-it character was entered into every single story within your document including captions and headlines. Probably not what you would want. One solution is to select only the frames on your page and then in the Find/Change dialog box, set the Search to Stories. This would put the character only inside of the frames that were selected. Useful for a single page but not in a longer document which would require you to select every frame on each page. Not to mention that you can't select items across pages in InDesign!

A much more robust solution involves the use of Paragraph Styles in your document. When I set up this document, I created several paragraph styles to apply formatting to the text. As you can see, I've created a Body, Caption, and Heading style.


Now, following the same steps as in part 1, go into the Find/Change dialog box and set everything as before. This time however, click on the More Options button in the upper-right corner of the dialog box to display additional options. If you see the Fewer Options button, you're already where you need to be. Click on the "Specify attributes to find" button in the Find Format section of the dialog box and in the Find Format Settings dialog box, choose Body or the style in which you want the end-it mark to appear. Click OK then click the Change All button. Voila! All of your end-it marks should appear in only the stories that contain that style. Sweet!


The Specify attributes to change button.

Keep checking back! In part 3 we'll perform this operation with an in-line graphic which is useful when the end-it mark isn't a font but an actual graphic that needs to be placed at the end of every article.